Google Ads Tracking for Shopify : The Only Free 2025 guide with JS CODE
Hey, what’s up, amazing Google Ads community!
If you’re here, chances are you’ve tried countless YouTube tutorials to configure Google Ads tracking with Shopify in 2025, only to hit a dead end. Most tutorials are now outdated since Shopify removed the ability to add custom scripts at the checkout level for security reasons.
Now, setting up GTM requires hours of research—when all you really want is to launch your awesome Google Ads campaign for your cool Shopify store. But don’t worry, I’ve got you covered! I’m sharing free, fully working code that works seamlessly on ANY Shopify store.
If you find this hard work helpful, I’d truly appreciate it if you could give my YouTube video a like or even drop a comment. It means a lot as I’m just starting with Youtube!
Thanks in advance,
Enjoy,
Darius
Method:
Go to Shopify Settings/Clients Events, Create a new custom pixel and then, change the thickbox this way:
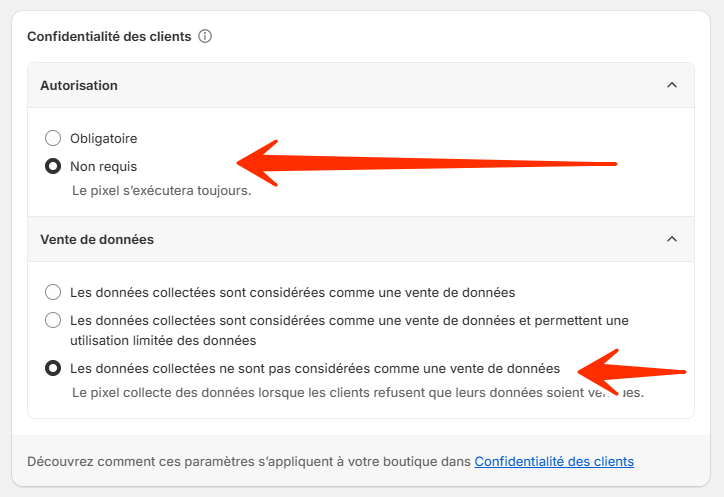
Name it as you want, I named mine :
GTM Checkout Custom Datalayer
Code:
Then copy and paste this code in your new custom pixel:
					const event_prefix = '';
const formattedItemId = true;
const gclidWithPageLocation = true;
const GTM_container_url = 'https://www.googletagmanager.com';
const GTM_container_id = 'REPLACEYOURGTMCODEHERE';


let storeCountryCode = window.localStorage.getItem('shopCountryCode');
storeCountryCode = storeCountryCode || 'US';
window.dataLayer = window.dataLayer || [];
function gtag() {
    dataLayer.push(arguments);
}

//checkout pages event
if(/.+\/checkouts?\/.*/.test(window.location.href)) {
    // tag manager
    (function(w, d, s, l, i) {
        w[l] = w[l] || [];
        w[l].push({
            'gtm.start': new Date().getTime(),
            event: 'gtm.js'
        });
        var f = d.getElementsByTagName(s)[0],
            j = d.createElement(s),
            dl = l != 'dataLayer' ? '&l=' + l : '';
        j.async = true;
        j.src = GTM_container_url + '/gtm.js?id=' + i + dl;
        f.parentNode.insertBefore(j, f);
    })(window, document, 'script', 'dataLayer', GTM_container_id);

    analytics.subscribe('page_viewed', (event) => {
        const eventData = {
          event: event_prefix + 'page_view',
          page_location: getPageLocation(event),
        }

        window.dataLayer.push(eventData);
        eventLog('page_view', eventData);
    });
    // end tag manager


    // DataLayer Events
    analytics.subscribe('payment_info_submitted', (event) => ecommerceDataLayer('add_payment_info', event));

    analytics.subscribe('checkout_shipping_info_submitted', (event) => ecommerceDataLayer('add_shipping_info', event));

    analytics.subscribe('checkout_completed', (event) => ecommerceDataLayer('purchase', event));

}


function eventLog(eventName, eventData) {
    const css1 = 'background: red; color: #fff; font-size: normal; border-radius: 3px 0 0 3px; padding: 3px 4px;';
    const css2 = 'background-color: blue; color: #fff; font-size: normal; border-radius: 0 3px 3px 0; padding: 3px 4px;';

    console.log(
      '%cGTM DataLayer Event:%c' + event_prefix + eventName, css1, css2, eventData
    );
}

function getPageLocation(event) {
    let pageLocation = event.context.document.location.href;

    if(gclidWithPageLocation) {
      const name = '_gcl_aw';
      const value = `; ${document.cookie}`;
      const parts = value.split(`; ${name}=`);

      if (parts.length === 2) {
        const gclidCookie = parts.pop().split(';').shift();
        const gclidParts = gclidCookie.split('.');
        const gclid = gclidParts[gclidParts.length - 1];

        pageLocation = pageLocation.includes('?') ? `${pageLocation}&gclid=${gclid}` : `${pageLocation}?gclid=${gclid}`;
      }
    }
  return pageLocation;
}

async function sha256Hash(value) {
    const encoder = new TextEncoder();
    const data = encoder.encode(value);

    const hashBuffer = await crypto.subtle.digest('SHA-256', data);

    const hashArray = Array.from(new Uint8Array(hashBuffer));
    const hashedValue = hashArray.map(byte => ('00' + byte.toString(16)).slice(-2)).join('');
    return hashedValue;
}

async function ecommerceDataLayer(gtm_event_name, event) {
    let hash_email;
    let hash_phone;
    const phone = event.data?.checkout?.phone;
    const email = event.data?.checkout?.email;

    if (phone) {
        hash_phone = await sha256Hash(phone);
    }

    if (email) {
        hash_email = await sha256Hash(email);
    }


    const customerInfo = {
        customer: {
            first_name: event.data?.checkout?.billingAddress?.firstName || event.data?.checkout?.shippingAddress?.firstName,
            last_name: event.data?.checkout?.billingAddress?.lastName || event.data?.checkout?.shippingAddress?.lastName,
            email: email,
            hash_email: hash_email,
            phone: phone,
            hash_phone: hash_phone,
            address: event.data?.checkout?.shippingAddress
        }
    }
    dataLayer.push(customerInfo);

    const dataLayerInfo = {
        event: event_prefix + gtm_event_name,
        page_location: getPageLocation(event),
        ecommerce: {
            transaction_id: event.data?.checkout?.order?.id,
            value: event.data?.checkout?.totalPrice?.amount,
            tax: event.data?.checkout?.totalTax?.amount,
            shipping: event.data?.checkout?.shippingLine?.price?.amount,
            currency: event.data?.checkout?.currencyCode,
            coupon: (event.data?.checkout?.discountApplications || []).map(discount => discount.title).join(','),
            items: (event.data?.checkout?.lineItems || []).map(item => ({
                item_id: formattedItemId ? 'shopify_' + storeCountryCode + '_' + (item.variant?.product?.id || '') + '_' + (item.variant?.id || '') : item.variant?.product?.id,
                product_id: item.variant?.product?.id,
                variant_id: item.variant?.id,
                sku: item.variant?.sku,
                item_name: item.title,
                coupon: item.discountAllocations?.discountApplication?.title,
                discount: item.discountAllocations?.amount?.amount,
                item_variant: item.variant?.title,
                price: item.variant?.price?.amount,
                quantity: item.quantity,
                item_brand: item.variant?.product?.vendor,
                item_category: item.variant?.product?.type

            }))
        }
    }

    dataLayer.push({
        ecommerce: null
    });
    dataLayer.push(dataLayerInfo);
    eventLog(gtm_event_name, Object.assign({}, dataLayerInfo, customerInfo));
}
2/ The Shopify snippet code for Google Ads Tracking in 2025
Method:
Go to your Shopify theme code and add a new snippet that you will call data-layer :
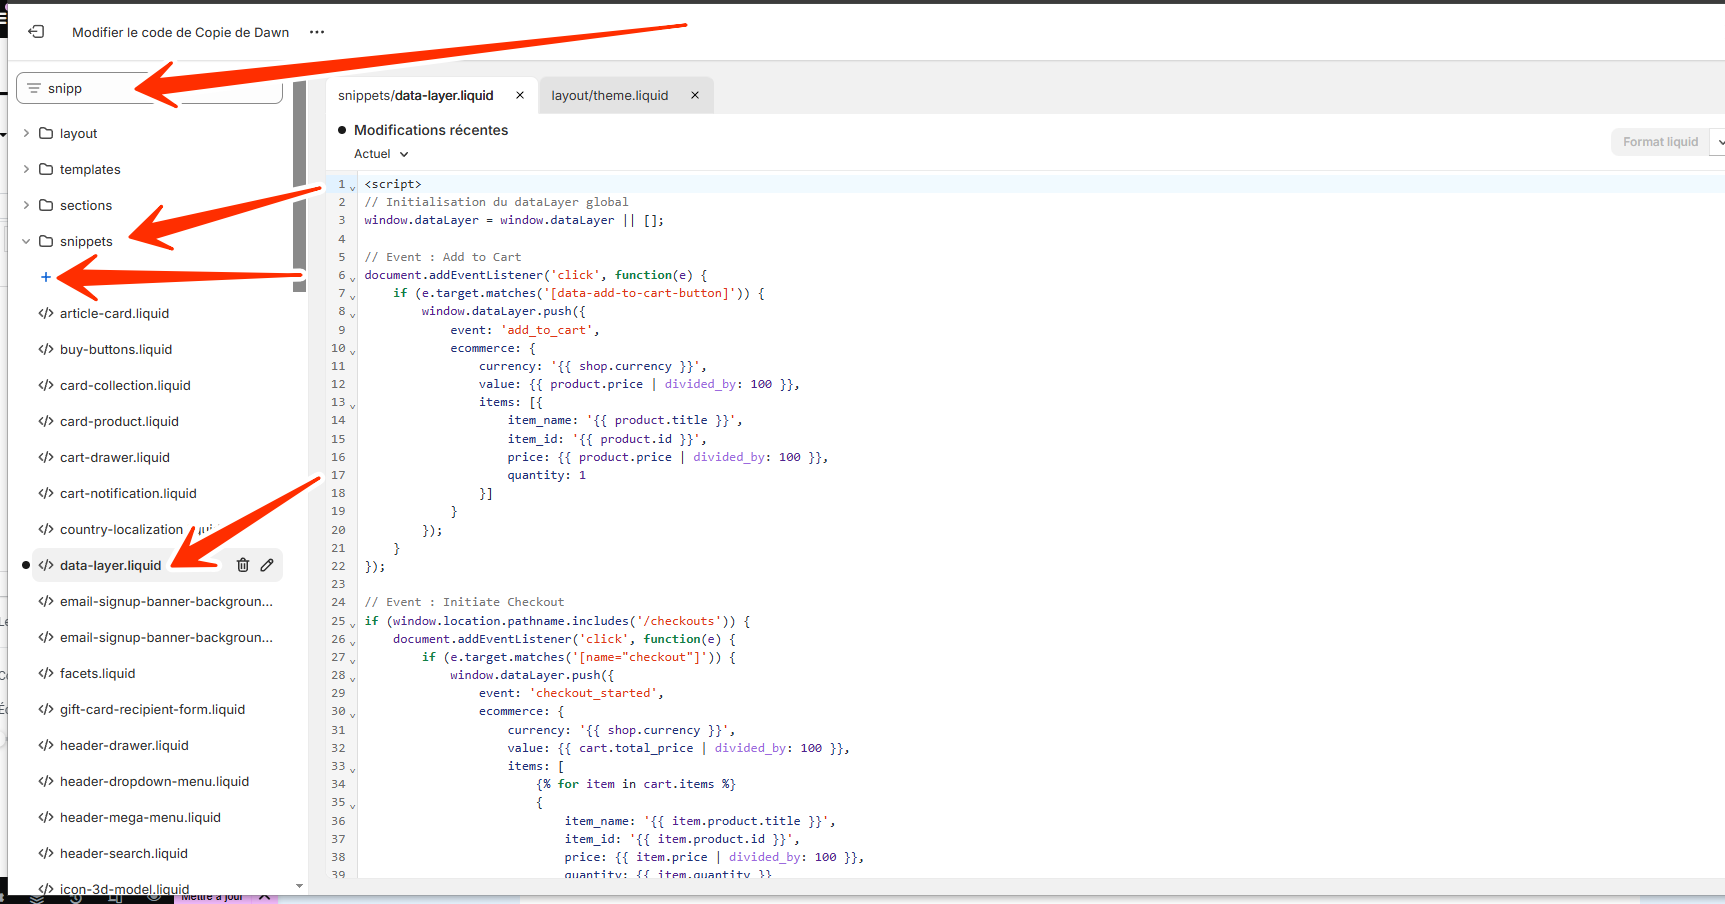
Code:
Then copy and paste this code in your data-layer snippet:
					<script>
// Initialisation du dataLayer global
window.dataLayer = window.dataLayer || [];

// Event : Add to Cart
document.addEventListener('click', function(e) {
    if (e.target.matches('[data-add-to-cart-button]')) {
        window.dataLayer.push({
            event: 'add_to_cart',
            ecommerce: {
                currency: '{{ shop.currency }}',
                value: {{ product.price | divided_by: 100 }},
                items: [{
                    item_name: '{{ product.title }}',
                    item_id: '{{ product.id }}',
                    price: {{ product.price | divided_by: 100 }},
                    quantity: 1
                }]
            }
        });
    }
});

// Event : Initiate Checkout
if (window.location.pathname.includes('/checkouts')) {
    document.addEventListener('click', function(e) {
        if (e.target.matches('[name="checkout"]')) {
            window.dataLayer.push({
                event: 'checkout_started',
                ecommerce: {
                    currency: '{{ shop.currency }}',
                    value: {{ cart.total_price | divided_by: 100 }},
                    items: [
                        {% for item in cart.items %}
                        {
                            item_name: '{{ item.product.title }}',
                            item_id: '{{ item.product.id }}',
                            price: {{ item.price | divided_by: 100 }},
                            quantity: {{ item.quantity }}
                        },
                        {% endfor %}
                    ]
                }
            });
        }
    });
}

// Event : Purchase (sur la page de remerciement)
if (window.location.pathname.includes('/thank_you')) {
    window.dataLayer.push({
        event: 'purchase',
        ecommerce: {
            transaction_id: '{{ order.name }}',
            affiliation: 'Shopify Store',
            value: {{ order.total_price | divided_by: 100 }},
            tax: {{ order.total_tax | divided_by: 100 }},
            shipping: {{ order.total_shipping_price_set.shop_money.amount }},
            currency: '{{ shop.currency }}',
            items: [
                {% for line_item in order.line_items %}
                {
                    item_name: '{{ line_item.title }}',
                    item_id: '{{ line_item.product_id }}',
                    price: {{ line_item.price | divided_by: 100 }},
                    quantity: {{ line_item.quantity }}
                },
                {% endfor %}
            ]
        }
    });
}
</script>
Now, your Shopify Store is correctly pushing data in the data layers for the Google Tools so let’s dive into GTM
3/ GTM configuration for Google Ads Ecommerce Tracking in 2025
TAGS:
First you have to create your tags in GTM.
If you haven’t yet, you need to install the Google Conversion Linker on all pages.
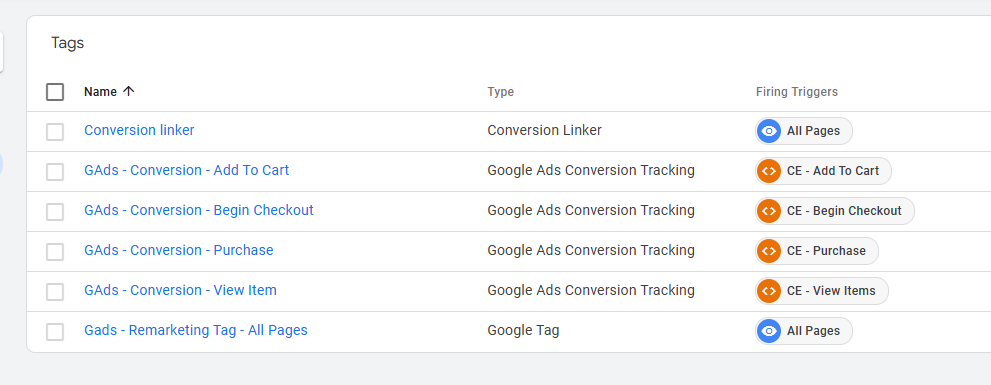
Then you will create the conversions in Google Ads : Add To cart, Initiate Checkout And purchase.
Copy and paste my tags settings:
How to fully set up the tags:
Type of tag: Google Ads Conversion Tracking
Conversion ID : Get it in your matching Google Ads conversion
Conversion Label : Get it also in your matching Description
Conversion Value : {{DLV – Value}} => This is a user defined variable that we will create here
Currency code : {{DLV – Value}} => This is a user defined variable that we will create here
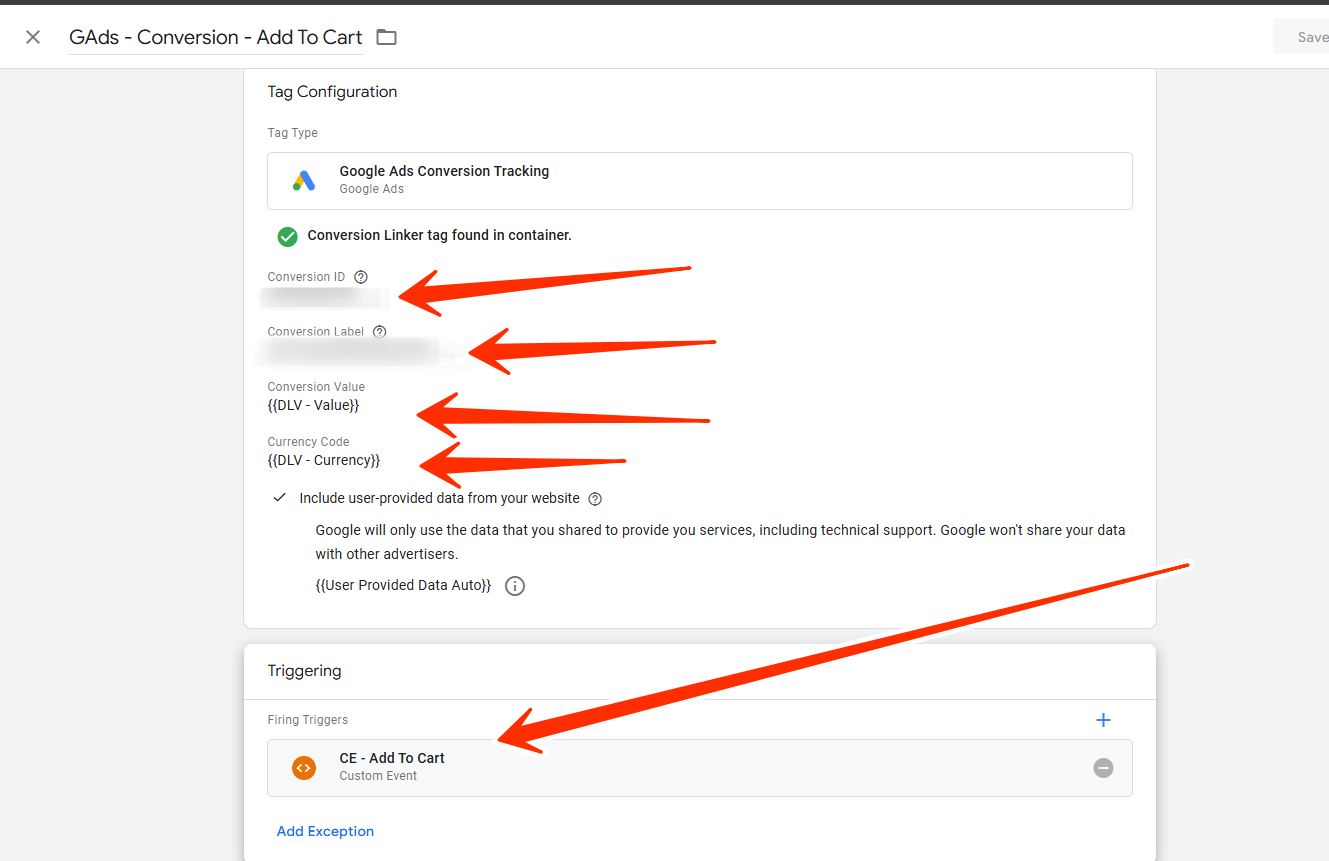
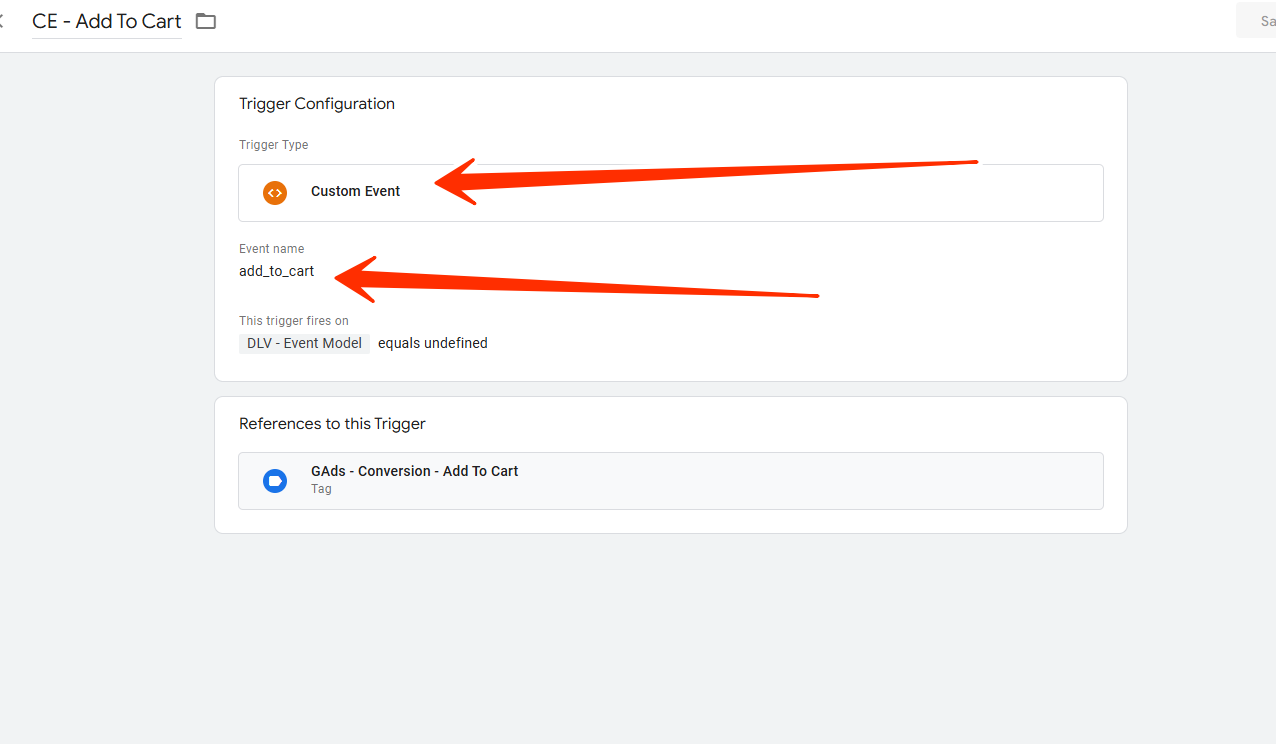
Configure the trigger with the event names with defined in shopify. Here for add to cart it’s :
IMPORT MY GTM SETUP FROM THIS GTM JSON FILE TO SAVE SOME TIME :
All the triggers for conversions:
1/ Add To Cart: add_to_cart
2/ Initiate Checkout: begin_checkout
3/ Purchase: purchase
USER-DEFINED VARIABLES:
All the user defined variables:
1/ Add To Cart: add_to_cart
2/ Initiate Checkout: begin_checkout
3/ Purchase: purchase
Use those dynamic values and add them to your Google Ads conversion tags in GTM.
That’s it, you are all set. If you need any help for your tracking or Google Ads campaigns, just send me a message.
And if you liked this tutorial, please let me know on my Youtube video!
Thanks for reading
4/ The full video tutorial
Le suivi des appels Google Ads : Guide Complet 2025
Le suivi des appels Google Ads : Guide complet 2025...
LireGoogle Ads Plombier 2025 : Guide Complet pour les Campagnes d’Appels
Google Ads Plombier 2025 : Guide Complet pour les Campagnes...
LireGuide Google Ads pour les Restaurants en 2025
Guide Google Ads pour les Restaurants en 2025 Après plus...
LireGuide 2025 Artisan : Obtenir de nouveaux clients sur le web
Guide 2025 Artisan : Obtenir de nouveaux clients sur le...
Lire


